Having clean tack isn’t just important for the show ring, if you regularly clean your tack it will not only last longer but be better for both you and your horse. That last statement may sound silly but if you think about when the mud dries it can become very hard which could rub against you and/or against your horse causing discomfort.
How often should I clean my tack?
You should clean the softer parts of your tack such as the girth, numnah, or saddle blanket after every ride, especially if it’s been muddy or your horse is particularly sweaty. In an ideal world you’d also give the rest of the tack a quick clean after every ride but let’s be honest we’re not living in an ideal world so once a week for a quick clean is fine. That said though you should clean mud off straightaway.
Once every few months though you should give everything a full and thorough clean, taking it all apart and cleaning everything.

Why do I need to clean my tack?
Cleaning your tack regularly will not only help keep it looking like new for as long as possible it’ll also protect it. If you don’t keep your tack clean, over time, it’ll start to harden with all of the mud and sweat. While this might not seem like an issue if your saddlery starts to toughen up and it could become uncomfortable to your horse as it’ll start to rub against him rather than flex with his movements.
If your saddlery is made of leather then this cleaning and polishing will also help to keep the leather nice and subtle.
How to clean the bridle
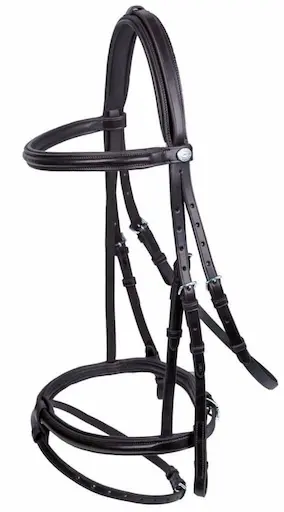
To start with you need to take the bridle apart, don’t worry though it’s pretty straightforward to put back together but if you’re not sure how to does why not put color-coordinating string on various parts. For example for the buckles that fasten the cheek strap to the headband why not use one color, where the throatlatch attaches use another color, and so on.
Once you’ve taken the bridle to pieces place the bit in a bucket of clean water to soak while you clean the rest of the bridle. To clean the leather parts of the bridle you’ll need a sponge, some warm water, and a bar of saddle soap. Make sure the sponge is wet, but not ringing wet, and use it to lather up the saddle soap. Next, taking one piece at a time, go over each strap with the soapy sponge before hanging it up or laying it on a clean surface. Depending on the soap you have you may need to wash it off after a few minutes so check the instructions there. Once you’ve done this and your bridle is dry you may want to apply some polish or conditioner too, this will help to protect it as well as keep it soft and supple.
Now back to the bit, while you’ve been cleaning the rest of the bridle the bit has had plenty of time to soak, this will have removed a lot of the dried saliva from it. Before attaching it back to the bridle you should go over it with an old toothbrush to get rid of any stubborn bits that soaking didn’t remove. There’s a useful tip below involving toothpaste that you might find helpful too.
After you’ve cleaned the bridle and it’s fully dry you can then put it back together. This should be pretty easy, especially if you used the tip with the string too.
How do I clean the saddle?
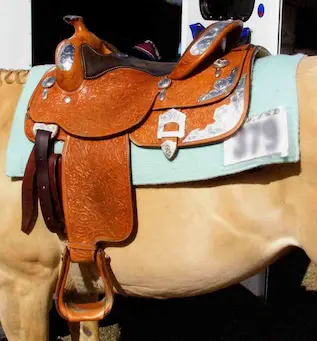
If you have metal stirrups then you should remove them first and put them in a bucket of clean water.
Like the bridle, you should remove any parts that can be removed, such as the stirrup leathers, girth, and if you have one martingale. Some parts, such as the girth may be machine washable but anything that’s leather should be thoroughly cleaned with a wet sponge and saddle soap, don’t forget to clean under the saddle too. Depending on the soap you have you may have to wash the soap off after.
Once you’ve cleaned the saddle you should use a small amount of leather polish or conditioner to help condition and protect the leather. This will also give the saddle a nice shine but don’t use too much on the seat or knee pads or you’ll find the leather is too smooth and you won’t have the same amount of grip as you did before. If your saddle has a lot of decoration, especially if it has contrasting stitching, then check the label of the polish before using it, some polishes advise against using on light-colored stitching as it can discolor it.
What if your tack isn’t made of leather?
Not all saddlery is made of leather these days, bridles can be made from nylon webbing while saddles can be made from synthetic materials. If this is the case then the cleaning process is slightly different but still just as important.
Bridles made from webbing can easily be washed in a bucket of warm soapy water but you must make sure you get all of the soap out afterward. If you leave the soap in it’ll make the material much tougher and will uncomfortable for your horse.
Generally, synthetic saddles are pretty to not only clean but also to keep clean as you can quickly brush the mud off regularly. Once you’ve brushed all of the mud and dirt off place the saddle on a saddle stand (or a fence if you don’t have a stand) and wash it with warm soapy water. Make sure you wash every part of it then you can use a regular hose to rinse all of the soapy water off.
Useful tips for getting your tack really clean
Over the years I’ve picked up a few tips and tricks that I’ve found to be very useful so I thought it would be helpful to list some of them below:
- Toothpaste – yes that’s right, toothpaste! This is a tip I picked up many moons ago and have found it to be invaluable. Get an old toothbrush with a little bit of Childs toothpaste on it and thoroughly clean the bit after you’ve soaked it for a while. This will not only help to clean every part of it it will also help horses to salivate, making the bit more responsive. If you have trouble getting your horse to accept the bit it can also help with that. I use children’s toothpaste because it has less fluoride than adult toothpaste.
- A machine-washable bag or old pillowcase – remove any of the washable parts of your tack and put them in a machine-washable bag or an old pillowcase. This will not only help to protect your washing machine from the heavy buckles but it will prevent them from getting tangled up. You don’t need to put the numnah or saddle blanket in the bag, this can be put in the washing machine without a bag.
- Metal polish – if you’re looking to get metal fastenings (such as buckles or D rings) really shiny then a little bit of metal polish will work wonders here, you could even use silver or brass polish depending on the color of the metal. Just don’t use it on any part that goes in your horse’s mouth or near his eyes.
- Don’t use washing up liquid – it can be very tempting to use a bit of washing up liquid to clean that saddle or bridle it’s not a good idea. Washing up liquid by its nature is a detergent and will remove condition from the leather and dry it out over time.
- Beeswax – if you don’t have any saddle soap then beeswax will work just as well, if not better. After you’ve got the mud and dirt off of the leather the natural acids in beeswax will help to clean the leather and soften it at the same time.
- Not everything should shine – if your saddle has a leather seat then be careful about how it is. If your seat is too shiny then you’ll lose some of the grip, the same goes for the knee pads and shirts. Instead, you want to have a small amount of roughness to these areas, not enough so that you can see it but enough so that you won’t be sliding about in the saddle.
- Shoe polish – over time the color of leather can fade so you can use shoe polish to restore the color. Before going over the whole saddle though test the polish out on an inconspicuous area first to make sure it’s a good match. If you have light jodhpurs though do make sure you remove all of the excess polish before using the saddle again otherwise you’ll find your jodhpurs have changed color too.
Conclusion
As you can see keeping your tack clean doesn’t need to be hard work. Just a quick clean every week is often enough to keep it spotless until you give it that thorough deep clean.
I hope you found this article helpful. If you did I’d be grateful if you could share it please as it would really help me.
Recommended products
Over the years I have tried hundreds of different horsey products, from various blankets and halters to different treats. Some I’ve loved, others I’ve hated but I thought I’d share with you my top all-time favorite products, the ones I never leave the yard without. I’ve included links to the products (which are in no particular order) that I really think are great.
- Horse Knots by Reference Ready – If you’re like me and enjoy pocket reference guides then you’ll love this knot tying guide. These handy cards can easily fit in your pocket or attach to the saddle for quick reference. They’re waterproof, durable and are color coded to make them easy to follow.
- Mane ’n Tail Detangler – Even if you never show your horse you’ll need to detangle his tail from time to time (and possibly his mane too) which is always a challenging chore! I’ve found that if I run a little bit of detangler through my horse’s tails every few days it stops them from getting matted up and makes combing them easy, even if they’re coated in mud. I don’t know if I should admit to this or not but it also works wonders on my hair.
- TAKEKIT Pro clippers – Over the years I’ve tried a lot of different clippers and while some were obviously better than others I found these to be by far the best. They are heavier than a lot of other clippers but for me, that’s a good thing, it makes them feel more sturdy and hardwearing. On top of that they have a range of speeds so are just as good for clipping your horse’s back as they are his face. I also like the fact that they come in a handy carry case but that’s not for everybody. The company that makes them is super good and incredibly helpful too, a real bonus these days. The only thing I wasn’t keen on was the fact that it doesn’t come with any oil, but that’s not a major problem as it’s not difficult to buy lubricant.
- Shire’s ball feeder – There are so many boredom buster toys out there but I like to use these every day, regardless of whether or not my horses are bored. I find that it helps to encourage my horses to problem solve by rewarding them with treats (or pieces of fruit) but it also mimics their natural grazing behavior which helps to keep them calm and de-stressed.
- Horse safe mirror – This is a strange one that many people are surprised about but I like to put horse safe mirrors in the trailers as well as in the quarantine stalls. It helps to prevent the feeling of isolation by giving the impression of other horses being around. Being herd animals horses can get extremely stressed when they feel that they’re on their own but with these stick-on mirrors, they believe that at least one other horse is with them.
- Rectal thermometer – I know this isn’t glamourous at all but it’s vital for your horse’s well-being to be able to check their temperature and a rectal thermometer is the easiest way of doing this which is why I’ve added it to the list.
Shopping lists
I’ve also put together a few shopping lists of essential items that I’ve found helpful over the years. I’ve broken the lists down into different categories rather than put everything in one massive list 😉
Recent Posts
Pads & Blankets: What Are They And Are They Really Necessary?
When we think about what tack we need, saddle pads and saddle blankets aren’t often at the forefront of our minds. We all know that they go underneath a saddle but there’s still a lot of...
Have you ever wondered what racehorses wear over their eyes, or seen a horse pulling a carriage with its eyes covered? Known as blinders or blinkers, these strange coverings do actually serve a...