Showing your horse can be great fun but if you’ve never done it before it can seem pretty daunting the first time. Fear not though I’ve put together this handy guide to help you through the process and explain some of the etiquette. In this article, I’ll be talking about judged exhibitions rather than the international events that are held under the rules of the Fédération Équestre Internationale or FEI (the world governing body for equestrian sports). I’ll cover those in another article though so look out for that in the future.
What does it mean to show a horse?
What a horse show means differs from country to country but as a general rule, it’s an event whereby you show your horse and its abilities either ridden or in hand. Some events are breed, type or discipline specific whereas others are open to all.
What does in hand mean?
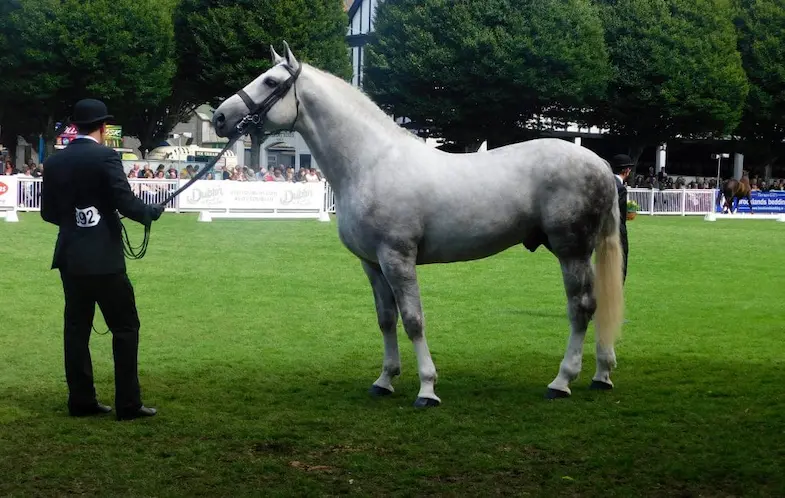
If you’re showing in hand it means that you don’t ride at all instead you’ll be leading them, in a group at first then individually. Usually, all entrants lead their horses or ponies in at the same time and walk steadily around the edge of the arena, with the handler on the outside and the horse on the inside nearer the judge. The judge will then ask you all to stop then one at a time you’ll be required to trot round to the back of the line. After this you’ll be called, one at a time, to lead your horse into the middle of the arena so the judge can assess them, you will also be asked to walk away from the judge then turn back towards them and trot your horse in a straight line past the judge and then back round to the rear of the line. Once everybody has done this you’ll all be asked to walk around again but this time the judge will call horses into the centre one by one where they’ll be awarded rosettes depending on where they were placed.
Ridden shows

Generally ridden classes throughout the world follow the same routine. Similar to the in hand class you will all start together and walk around the edge of the arena. At some point, you’ll be asked to trot for a while before transitioning to a canter. The judge will then ask each of the riders in turn to change rein (change the leg with which the canter leads). You won’t spend long on the other rein then the judge will ask you all to return to a walk before calling you all in. Next, you’ll be asked, one at a time, to walk, trot and canter on both reins and in some classes, you’ll also be asked to gallop and jump as well. At bigger events there’s can also be an in hand section where you’ll be asked to remove your horse’s saddle and lead him as you would during and in hand class. Once every rider has done this the judge will then call the top 6, 8 or 10 into the centre and award rosettes.
Exceptions
- Open classes – These will often require you to gallop in addition to walk, trot and canter
- Best Turned Out – Instead of having to ride around one at a time you will asked to ride forward where the judge will inspect how both you and your horse are turned out.
- Family or Handy Horse/Pony – In these classes you’ll also be expected to navigate an obstacle course. The obstacles can range from the bizarre such as walking over tarpaulin to the ordinary such as jumping a small cavaletti (a small ‘x’ shaped jump that can be rotated to alter the height).
- Best Trained – These classes are designed to demonstrate how well trained your horse is so the judge will ride your horse too.
Preparing for a show
It is always advisable to do as much as you can before the day of the show. If you plan everything out before then you’ll be ready for anything. You don’t need to plan too far in advance, one or two days before is fine.
Tack
Ideally, a couple of days before it’s a good idea to clean all of your tack. You need to make sure that it’s not only free of dirt but also clean too. Start by using a brush (with soft bristles) to get any loose mud off, at this stage, I also use a vacuum cleaner to get all of the dirt out of crevices. Next use a damp sponge to remove any dried in dirt before thoroughly washing the tack. Before applying leather oil check over the stitching to make sure none of it is loose. If you have any metal on show you can get that really gleaming with a metal polish such as Brasso, whatever you do though DON’T use it on the bit, especially if it has a mouthpiece.
Your clothing
When preparing for a show don’t forget to get your outfit ready too. You’d be surprised how many people overlook this. Yes, it’s your horse that is being judged but you’ll lose marks if you’re not turned out properly too. Make sure you adhere to any rules that are set about attire. Make sure it’s all washed and ironed the day before and if possible hang it up in a suit bag to make sure it’ll stay protected from dust.
Trailer
Of course, you’re not going to be judged on the transport by which you arrive but if you’re travelling in a dirty trailer then your horse is naturally going to pick up some of that dirt. You don’t need to go to town on cleaning the trailer but just make sure you’ve swept it out and given it a quick hose down to free dust and dirt particles. If it’s a warm day then you can do this the day before otherwise, it’s best to give the trailer a few days to dry out.
Horse
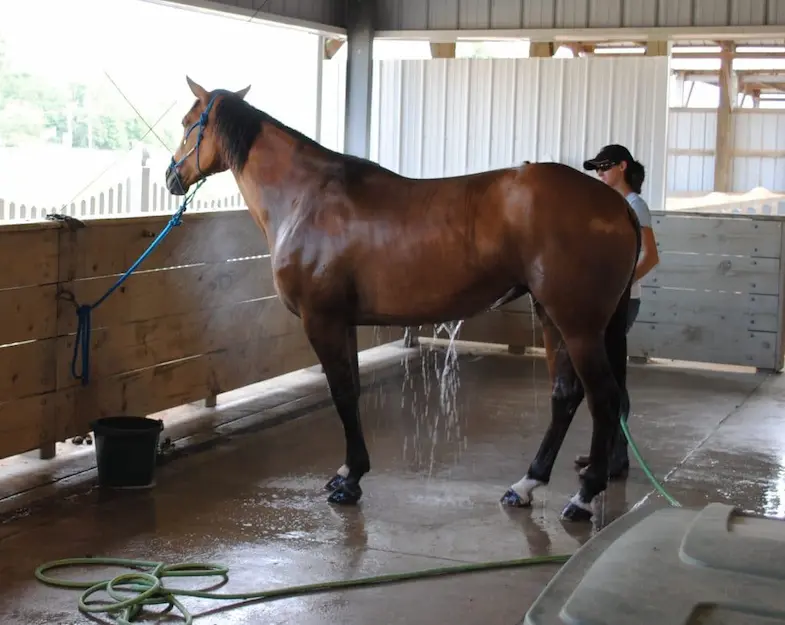
Of course, your horse is the most important thing here so you’ll want to spend the most amount of time getting him ready. Start by grooming your horse to release caked in mud from his coat then gently wash his face. Before you wash the rest of your horse make sure you clean delicate areas such as around the eyes, nostrils, anus and genitals (although please use separate sponges for each of these areas). Next washing him thoroughly with a good equine shampoo, these days there are plenty to choose from and many are tailored to your horse’s coat colour. Once you’ve washed your horse and removed all of the shampoo it’s time to start to dry him. You can remove excess water with a clean sweat scraper then use dry towels to remove what’s left. If it’s a cold day you can put straw under a sweat rug to help him dry off without getting cold.
After your horse is dry you can turn your attention to his mane and tail, make sure they are both tangle-free and even. On the morning of the show, you can plait his mane and tail if your class requires it, see below for guidance on this.
Tricks of the trade
- Chalk – If your horse is light grey or has white feathers you can rub a little bit of chalk into his coat and or feathers. This will make them really white. You can also use baby powder to get the same effect.
- Hair spray – Once you’ve plaited your horse’s mane and tail you can help to keep it in place with a a little bit of hair spray. Do use too much though as it’ll look unnatural.
- Baby wipes – This is especially good if your horse’s coat is dark in colour. A quick wipe with a baby wipe will give his coat a healthy shine.
- Apple cider vinegar – We’ve all heard of the health benefits of apple cider vinegar but mixing a little bit of it with warm water will help you to remove any sweat stains prior to washing.
- Stable over night – After washing your horse you should, if possible, stable him over night, ideally with a summer rug and leg bandages to help keep their coat dust free.
To plait or not to plait

As a general rule, your should plait your horse’s mane and tail if you’re showing them in hand but this is to some extent dependant on the breed. For example, an Exmoor is likely to be natural whereas an Arab would be plaited.
If you’re showing your horse in a ridden class then generally the mane should be plaited but the tail should be pulled. This means that the horse’s tail has been thinned to make it look more ‘polished’ and enhance the shape of its hindquarters. This can be done with scissors or clippers. The term ‘pulling’ comes from the practice of actually pulling strands of the mane or tail out to thin it out.
Tail ribbons
You may have noticed that some horses have a ribbon in their tail. This isn’t for decoration but is a message to other riders or handlers. So what do the ribbons mean?
- Red – A red ribbon means that the horse is a kicker and that you shouldn’t get too close.
- Blue or Yellow – Horses with either a blue or yellow ribbon, or both, in the tail are stallions. Blue is sometimes used for aggressive geldings too.
- Green – This indicates that a horse is either a youngster or is inexperienced.
- Pink – Pink ribbons are reserved for mares in season.
- White – If you see a white ribbon in a horses tail the owner is letting you know that the horse is for sale.
Etiquette
As with most things, there are unwritten rules that you should do your best to stick to and the show ring is no exception. Most of these rules are common sense things such as when parking don’t box anybody in and park where the officials have told you to do so. But what about the less obvious ones? I’ve tried to list the most important ones below:
- Collecting your number – When you’re collecting your number make sure you’ve got all of your papers and don’t cut in. Make sure you’ve given yourself enough time to queue if necessary.
- Stick to you lane – If there are a lot of riders warming up in the same time it can be pretty hectic, especially if some are walking, some are trotting and others are cantering. It may seem like a nightmare at first but it’s just like a highway really, the faster horses are on the outside with those walking closest to the centre.
- In the ring – During your class make sure you pay attention to everything, not just the judges but other entrants too, don’t get in anybodies way. If you’re behind a slower horse you can use the corners to help you keep your distance, making full use of the arena will give you a slightly larger area to cover and will help keep the gap consistent.
- Be quietly proud – If you’re entering more than one class and have already won one of your previous classes don’t keep the rosette on your horses neck. As much as you want to this will only lead to embarrassment when you asked to remove them before entering the ring.
- Have fun – Remember to enjoy yourself, of course you want to win but if you don’t it’s not the end of the world. You’ve still had an enjoyable day and you can use what you’ve learnt for next time.
Ribbons explained
Most shows will award rosettes to the top six entrants of each class with some bigger events awarding them up to 10th place with special tri-coloured rosettes for the champion and reserve champion. Each country has its own colour order but as a rough guide this should help:
| Australia | Canada | Germany | Netherlands | New Zealand | UK | USA | Olympic | |
|---|---|---|---|---|---|---|---|---|
| 1st |  |  |  |  | | | |  |
| 2nd |  |  |  | | | | |  |
| 3rd |  | | | | | | |  |
| 4th |  | | | | | | | |
| 5th | | | | |  | | | |
| 6th |  | | | |  | | | |
| 7th | | |  | |  | |||
| 8th | | |  | |  | |||
| 9th | | | | | ||||
| 10th |  | | |  | ||||
| Champion |  |  |  |  |  | |||
| Reserve Champion | |  |   |
Conclusion
As humans, we’re always nervous about the unknown and of course, you’ll be apprehensive before your first show but if you follow this guide I’m sure you’ll have a great time and will look back wondering what it was you were so worried about. So what are you waiting for, get out there and start showing your horse!
I hope you found this article helpful. If you did I’d be grateful if you could share it please as it would really help me.
Recommended products
Over the years I have tried hundreds of different horsey products, from various blankets and halters to different treats. Some I’ve loved, others I’ve hated but I thought I’d share with you my top all-time favorite products, the ones I never leave the yard without. I’ve included links to the products (which are in no particular order) that I really think are great.
- Horse Knots by Reference Ready – If you’re like me and enjoy pocket reference guides then you’ll love this knot tying guide. These handy cards can easily fit in your pocket or attach to the saddle for quick reference. They’re waterproof, durable and are color coded to make them easy to follow.
- Mane ’n Tail Detangler – Even if you never show your horse you’ll need to detangle his tail from time to time (and possibly his mane too) which is always a challenging chore! I’ve found that if I run a little bit of detangler through my horse’s tails every few days it stops them from getting matted up and makes combing them easy, even if they’re coated in mud. I don’t know if I should admit to this or not but it also works wonders on my hair.
- TAKEKIT Pro clippers – Over the years I’ve tried a lot of different clippers and while some were obviously better than others I found these to be by far the best. They are heavier than a lot of other clippers but for me, that’s a good thing, it makes them feel more sturdy and hardwearing. On top of that they have a range of speeds so are just as good for clipping your horse’s back as they are his face. I also like the fact that they come in a handy carry case but that’s not for everybody. The company that makes them is super good and incredibly helpful too, a real bonus these days. The only thing I wasn’t keen on was the fact that it doesn’t come with any oil, but that’s not a major problem as it’s not difficult to buy lubricant.
- Shire’s ball feeder – There are so many boredom buster toys out there but I like to use these every day, regardless of whether or not my horses are bored. I find that it helps to encourage my horses to problem solve by rewarding them with treats (or pieces of fruit) but it also mimics their natural grazing behavior which helps to keep them calm and de-stressed.
- Horse safe mirror – This is a strange one that many people are surprised about but I like to put horse safe mirrors in the trailers as well as in the quarantine stalls. It helps to prevent the feeling of isolation by giving the impression of other horses being around. Being herd animals horses can get extremely stressed when they feel that they’re on their own but with these stick-on mirrors, they believe that at least one other horse is with them.
- Rectal thermometer – I know this isn’t glamourous at all but it’s vital for your horse’s well-being to be able to check their temperature and a rectal thermometer is the easiest way of doing this which is why I’ve added it to the list.
Shopping lists
I’ve also put together a few shopping lists of essential items that I’ve found helpful over the years. I’ve broken the lists down into different categories rather than put everything in one massive list 😉
Recent Posts
Pads & Blankets: What Are They And Are They Really Necessary?
When we think about what tack we need, saddle pads and saddle blankets aren’t often at the forefront of our minds. We all know that they go underneath a saddle but there’s still a lot of...
Have you ever wondered what racehorses wear over their eyes, or seen a horse pulling a carriage with its eyes covered? Known as blinders or blinkers, these strange coverings do actually serve a...