You might think that the only reason for grooming your horse is to make him look incredible and his coat gleam but the benefits go far beyond his appearance, it will also keep your horse happy and healthy.
Regular (and meticulous) grooming will not only help to stimulate your horse’s circulation but it will also condition his muscles. It can also encourage oils to be released and distributed in the skin, this will have a two-fold benefit of boosting the skin’s ability to act as a barrier against disease and bacteria, as well as helping to create a shiny coat. On top of this, grooming your horse regularly will also make you familiar with every area of your horse’s body, giving you the ability to notice any lumps and bumps, scratches and scrapes, or other abnormalities, allowing you to deal with them quickly. Grooming your horse before you ride him will also make sure there’s no dirt that can get under the tack and rub against his skin, causing irritation and chafing over time.
Within the herd horses regularly groom each other for a variety of reasons, one of which being as a way of bonding with each other, so when you groom your horse you’re effectively acting as another herd member. Your horse will appreciate the attention you’re paying him when you’re grooming him but on top of that, it’ll also increase the bond the two of you have.
Grooming kit essentials
Let’s be honest, we’ve all crammed our grooming kits full of items that we’ve never used and have no intention of using. Whether its a selection of brushes all with a different stiffness of bristle or colored-coded cloths there’s a lot of unnecessary stuff in our kits and while you may find it useful at some point, there are only a handful of essential grooming kit items:
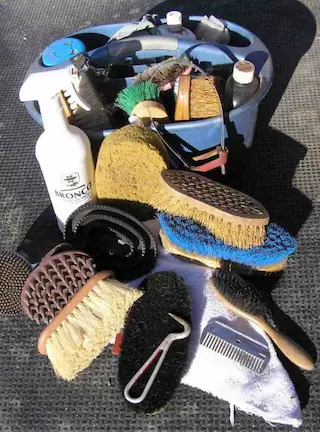
- Metal curry comb – Not only can they can be used to get rid of shavings and mud from your horse as well as improve the circulation of the skin, but they can also be used to clean brushes and blankets too. You should only use a circular metal curry comb on your horse, the standard (or square) combs are only for cleaning brush (and blankets if you’re careful).
- Rubber curry comb – Some people may argue about whether or not this is essential but I find it very good for areas that are too delicate for a metal curry comb, or for horses that don’t like the feel of metal combs.
- Hoof pick with a brush – Of course you can have a separate brush and hoof pick but I personally think that its better to combine the two together, that way when you’re picking out your horse’s hooves you’ve got both to hand and don’t have to hunt round in your grooming kit. It also takes up slightly less space. I personally like to use a hoof pick with a comfortable grip because I find it doesn’t slip.
- Rubber grooming gloves – I used to think that grooming gloves were a gimmick until I tried it for myself, they’re great for smoothing hair out, especially after you’ve washed your horse. It’ll also help you to bring out the natural shine of your horse’s coat. There’s a range of different gloves out there but I personally prefer the HandsOn™ glove.
- Body brush – Once you’ve loosened all of the dirt and hair from your horse’s coat you’ll need a brush to remove it from his body and there’s no better brush for the job. It’s generally soft enough to use around your horse’s face and on his legs, although if your horse is very sensitive around these areas then you might want to also add a face brush to your kit.
- Mane comb – You can use a body brush on your horse’s mane and tail but a dedicated mane comb will do a far better job at detangling it, it’ll also make braiding much easier too.
- Sponges – You should always have at least four sponges in your kit and replace them regularly, two for the face, one for the anus, and another for your horse’s genitals. Ideally, you should have different colored sponges for each area and replace them regularly. TIP: Most discount stores sell sponges in a variety of colors and they’re normally a lot cheaper than buying specialized ‘horse’ sponges from your tack shop.
- Baby wipes – These are so useful, they can be used to tame flyaway hairs, quickly remove grass stains, sweat, and dirt.
- Elbow grease – I know technically this isn’t something that you can include in your kit but it’s essential if you want to get your horse’s coat to really shine.
If you want to buy any of the products mentioned above then check out the helpful wishlist I put together on Amazon, it contains everything you’ll need.
Step 1: Tying your horse up
Okay, so this isn’t a grooming step but to some extent it’s the most important thing, after all, if you don’t secure your horse then he’s free to move wherever he wants which will only make your life harder. Even if your horse is trained to stand still it’s always a good idea to tie him up before you start.
I’m sure I don’t need to say this but you should ALWAYS use a quick-release knot so that, if there’s an emergency you can free him quickly and safely.
Step 2: Hooves
Cleaning your horse’s hooves should always be the first thing you do when grooming your horse. This will give you the chance to check his legs and feet for anything that may require immediate attention or prevent you from riding that day. If your horse has a stone or anything else stuck in his foot then removing that first will make him more comfortable while you groom the rest of him.
Step 3: Currying
Starting on your horse’s neck (near but not actually on his head) work your way down, in a circular motion, towards his tail with a metal curry comb. This will remove dead skin cells and loose hairs while also bringing the oils in his coat to the surface which is what gives the coat its shine. The more you curry your horse the softer the hair particles will become, this will make the hairs smoother and shinier.
You can do the same with a rubber curry comb around your horse’s head and on his legs, you can also use a rubber curry comb on his entire body if he doesn’t like the feel of a metal comb, or if you’re not keen on using it yourself.
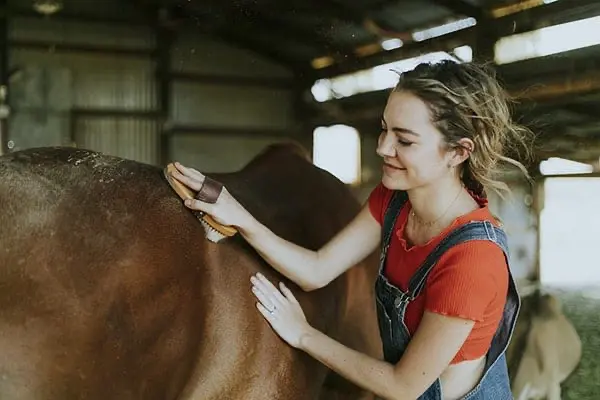
Step 4: The body
Once you’ve finished currying your horse use a body brush to go over his body with short ‘flicking’ movements. You should apply as much pressure as your horse is comfortable with but the firmer you brush the better job you’ll do. With every brushstroke, you should be able to see a cloud of dust as you remove the dirt and hair. The more work you put into this step the more your horse’s coat will shine as you’ll be bringing the natural oils of his coat to the surface and then distributing them over this coat. Don’t forget to brush the bristles against a curry comb every few strokes in order to dislodge the dirt and dust from them.
When it comes to your horse’s head and other sensitive areas make sure you’re gentle, if necessary use a softer face brush.
If you have a horse vacuum you can go over your horse’s body before using the body brush, this will remove the loose hair and dirt before you ‘polish’ your horse’s coat with the brush.
Step 5: Delicate areas
After you’ve finished your horse’s body it’s time to clean the delicate areas such as his eyes, nostrils, anus, and genitals. Use separate damp sponges for each area (having different colored sponges will help you to know which one is for which area) and gently wipe any dirt or debris away.
Some horses aren’t keen on these areas being cleaned so if your horse is unhappy respect that and either be more gentle or if he’s really unhappy about it stop.
Step 6: Mane and tail
Mane
You can use a body brush to remove the mud and dirt from your horse’s mane but if the mud is really caked in then try not to pull too hard on it, or use your hand to support the hairs and stop them from pulling too much.
Once you’ve got the dirt out of the mane you can start to comb it through to detangle it, if you do this regularly it’ll be easier but if it’s really tangled up then spray a little bit of detangler (such as Mane ’n Tail Tangle & Knot) and gently comb it through. The more often you comb your horse’s mane the easier it will be to maintain.
Tail
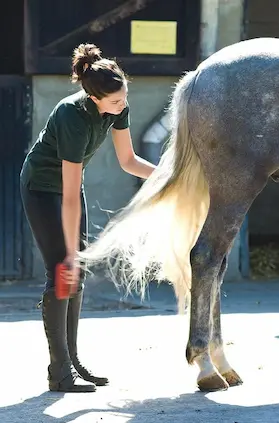
Tails can be very difficult to keep clean and tidy, in part because if the hairs are dirty and tangled they’ll break very easily. Washing the tail regularly will help to keep the hair clean and therefore making them less likely to break but if you’re not able to do this then using Show Sheen or baby wipes will help to keep the dirt out of the tail, it’ll also make brushing the tail easier.
If you are cleaning your horse’s tail and haven’t washed it (or used Show Shine/baby wipes) then spray a little bit of Mane ‘n Tail Tangle & Knot and use your fingers to gently detangle as much of it as you can before going over it with the body brush. This will help to remove the dirt but also keep the hairs separate and less likely to break. It’s also worth noting that the hair that makes up a horse’s tail is extremely slow-growing and can take up to three years to reach its full length.
Step 7: White markings
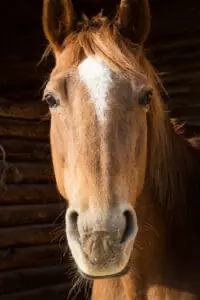
When it comes to getting your horse’s white markings really clean there are a number of things that you can do to remove any stains and discoloration. If, for example, your horse has white socks or stockings then keeping them clipped short will help to keep them tidy and therefore cleaner but you can also use blue or purple shampoo to brighten them up, just make sure you rinse the shampoo out properly.
For white tails that have started to turn yellow, you can use tomato ketchup to restore their natural color. Simply cover your horse’s tail with ketchup, leave it for around 20 minutes and then rinse off and you’ll be amazed at just how much whiter your horse’s tail is.
For horses with white faces or white facial markings, you can use a little bit of leave-in shampoo on a sponge or washcloth, this will get any stains (including grass) off with ease. While you’re doing this soak another clean cloth in some warm water, once you’ve finished you can use this to remove any excess shampoo from your horse’s face.
Step 8: Final shine
While this step isn’t completely necessary it will help to really make your horse’s coat shine and will only take a few minutes. Using a rubber grooming glove (or two gloves if you prefer), go over your horse’s whole body from head to tail, this will not only get rid of any loose hairs that have found their way back to his coat but will also help to remove any static that has built up over the grooming process.
Step 9: Clean blankets
Cleaning your blankets should be part of your daily grooming routine, after all, if your blanket is dirty then you’ll be putting all that dirt back onto your horse. Once you’ve finished grooming your horse you can use a metal curry comb to get rid of any dried sweat, and dirt as well as remove loose hairs from the inside of the blanket. If you do this regularly then it should only take a couple of minutes each time, but will save you a lot of time when you’re trying to get your horse’s coat really clean and shiny.
If you can you should also wash your blanket once a week on a cold wash cycle with a special cold water detergent, this will remove anything that the curry comb couldn’t but the cold cycle will also prevent the blanket from shrinking.
Step 10: Cleaning brushes
It’s just as important to clean your brushes as it is to clean your horse (and blankets), if you don’t then you’re just going to be brushing dirt into your horse’s coat instead of removing it.
If your brushes are synthetic and have plastic handles then you can place them in a mesh bag and put that in the washing machine on a delicate (or hand wash) cycle with a little bit of soap before allowing them to dry naturally.
For natural brushes (and those with wooden handles and synthetic bristles) you need to remove loose hairs first but then you can wash the brushes in a little bit of soapy water. Making sure you don’t get the wood too wet, use your hand to get rid of any stubborn dirt before thoroughly rinsing the soap out of the brushes and then leaving them to air dry.
Shop the article
While a lot of the items I mention in this article are generic and can be bought at any tack shop or discount store there are a few specific items that I’d recommend so thought it would be helpful to include Amazon links for them.
I hope you found this article helpful. If you did I’d be grateful if you could share it please as it would really help me.
Recommended products
Over the years I have tried hundreds of different horsey products, from various blankets and halters to different treats. Some I’ve loved, others I’ve hated but I thought I’d share with you my top all-time favorite products, the ones I never leave the yard without. I’ve included links to the products (which are in no particular order) that I really think are great.
- Horse Knots by Reference Ready – If you’re like me and enjoy pocket reference guides then you’ll love this knot tying guide. These handy cards can easily fit in your pocket or attach to the saddle for quick reference. They’re waterproof, durable and are color coded to make them easy to follow.
- Mane ’n Tail Detangler – Even if you never show your horse you’ll need to detangle his tail from time to time (and possibly his mane too) which is always a challenging chore! I’ve found that if I run a little bit of detangler through my horse’s tails every few days it stops them from getting matted up and makes combing them easy, even if they’re coated in mud. I don’t know if I should admit to this or not but it also works wonders on my hair.
- TAKEKIT Pro clippers – Over the years I’ve tried a lot of different clippers and while some were obviously better than others I found these to be by far the best. They are heavier than a lot of other clippers but for me, that’s a good thing, it makes them feel more sturdy and hardwearing. On top of that they have a range of speeds so are just as good for clipping your horse’s back as they are his face. I also like the fact that they come in a handy carry case but that’s not for everybody. The company that makes them is super good and incredibly helpful too, a real bonus these days. The only thing I wasn’t keen on was the fact that it doesn’t come with any oil, but that’s not a major problem as it’s not difficult to buy lubricant.
- Shire’s ball feeder – There are so many boredom buster toys out there but I like to use these every day, regardless of whether or not my horses are bored. I find that it helps to encourage my horses to problem solve by rewarding them with treats (or pieces of fruit) but it also mimics their natural grazing behavior which helps to keep them calm and de-stressed.
- Horse safe mirror – This is a strange one that many people are surprised about but I like to put horse safe mirrors in the trailers as well as in the quarantine stalls. It helps to prevent the feeling of isolation by giving the impression of other horses being around. Being herd animals horses can get extremely stressed when they feel that they’re on their own but with these stick-on mirrors, they believe that at least one other horse is with them.
- Rectal thermometer – I know this isn’t glamourous at all but it’s vital for your horse’s well-being to be able to check their temperature and a rectal thermometer is the easiest way of doing this which is why I’ve added it to the list.
Shopping lists
I’ve also put together a few shopping lists of essential items that I’ve found helpful over the years. I’ve broken the lists down into different categories rather than put everything in one massive list 😉
Recent Posts
Pads & Blankets: What Are They And Are They Really Necessary?
When we think about what tack we need, saddle pads and saddle blankets aren’t often at the forefront of our minds. We all know that they go underneath a saddle but there’s still a lot of...
Have you ever wondered what racehorses wear over their eyes, or seen a horse pulling a carriage with its eyes covered? Known as blinders or blinkers, these strange coverings do actually serve a...
